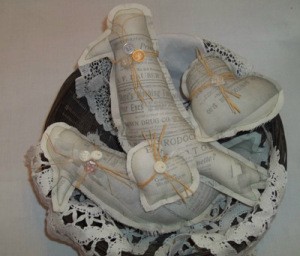
 Add a little vintage accent to your home with printed-fabric mini pillows. Your chosen graphics are printed directly onto your fabric using your computer printer.
Vintage newspapers, books, magazines, and greeting cards are perfect for fabric printing. Other options are purchased graphic software or perform a "free graphics" search online.
Use any shape desired for your pillows. You are only restricted by what will fit on the printed fabric sheet.
Note: If you are planning to sell your pillows, it is a good idea to check your image for copyright infringement.
Approximate Time: 1 hour
Supplies:
- freezer paper
- ruler
- pencil
- scissors
- white, off-white, or muslin fabric
- iron
- computer and printer
- graphic image
- tissue paper
- cookie cutters or pattern shapes for the mini pillows
- straight pins
- sewing machine
- stuffing
- raffia
- buttons, charms, or sequins
- craft glue
Instructions:
- Cut a sheet of freezer paper the same size as a sheet of printer paper. Place a piece of white, off-white, or muslin fabric on your ironing surface.
Lay the freezer paper on the fabric with the wax side facing down. Iron over the freezer paper.
Cut the fabric using the freezer paper as your guide.
The freezer paper is affixed temporarily and will provide the stiffness needed to feed the fabric through your printer.
- Scan or download your graphic. Edit and manipulate it to fill the page.
Insert the fabric sheet into your printer. Ensure the fabric is facing the right way so that the image will print on the fabric and not on the freezer paper.
Print the image.
- Peel the freezer paper from the back of the fabric. Do not throw the paper away. It can still be used several more times.
- Cut a piece of fabric the same size as your printed fabric.
This will be the back of your mini pillows and can be the same white used on the front or a contrasting fabric that will blend with your home's decor.
- Place the backing fabric on your work surface with the wrong side facing up.
Lay the printed fabric on top with the printed side facing up.
- Lay a sheet of white tissue paper or a scrap of tissue paper from an old sewing pattern over the printed fabric.
Trace cookie cutters or other desired shapes on the tissue paper.
- Leave a 1/2 inch of space between each traced shape.
Pin to hold all the layers together.
- Sew around the shapes on the traced lines, leaving a small opening. Cut out the shapes 1/4 inch from the stitched lines.
- The tissue paper has been perforated by the needle. Peel off the tissue paper from each cut shape.
- Fill the stitched shapes with stuffing. Sew the opening closed.
- Tie raffia strands around the pillows and use craft glue to attach buttons, charms, or sequins.
By Cyndee from Winfield, KS
Read More Comments