To make this project easier I removed my faucet and drain.
This made it a lot easier to get a solid coat of primer over everything besides the fact that I needed a new one.
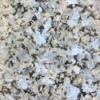
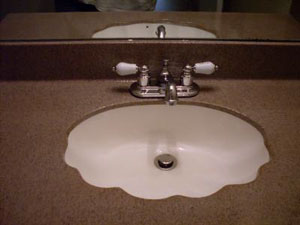
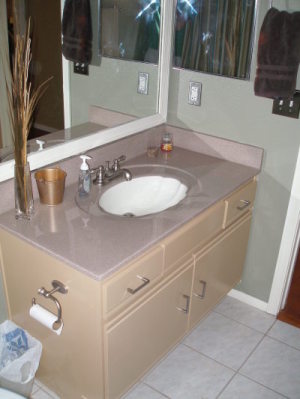
Also I used a grey primer base and a tan stone spray with black flecks. The variation with the grey and the tan with black flecks is very nice.
Now most of these can be purchased at Home Depot or Lowes even Walmart (where I got most of my stuff.) However the envirotex can usually be picked up at a craft store like Michaels, Joanns, and Hobby Lobby. Its relatively inexpensive ranging from 9-30 dollars depending on the amount you are getting.
Step 1. Clean your surface of any debris and sand well. If you own a belt sander its what I used for the flat surfaces and did the rest by hand.
Step 2. Wipe all the dust off from the sanding.
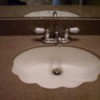
Step 3. With trial and error I have found that painting the sink white first is easiest and gives the best results.
Don't worry about taping the sink yet, just spray the Kilz white spray paint evenly over the entire sink area getting an even coat.
To avoid drips dont get to close to the surface. If you do get drips, wipe the excess and let it dry and sand and reapply if necessary. Let it dry.
Step 4. Tape the sink about a 1/4 the way down and tape paper to the bottom so the sink is completely covered with the exception of the "rim"
Step 5. Prime the entire counter top using your foam roller and brush with the Glidden Gripper. Let it dry. Follow Basic instructions on the Glidden can.
Step 6. Spray the Rust-Oleum over the entire counter to get the desired color/coverage. This is the point that you would add the glitter for the sparkle if you so desire. Let it dry
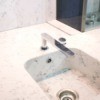
Step 7. Follow the instructions on the envirotex. Stir very well. If you don't you can end up with soft spots that won't dry.
Step 8. Start envirotexing your counter by working from the top down.. What I mean is start with the back splash and work your way down to the sink. Pour some envirotex into one of the disposable cups and slowly start pouring down the back splash. Use your paint spreader to "scoop" the puddles back up. Do this a few times to get the stuff to stick.
Then pour some on the counter and start working it around saving the sink for last.
Don't for get to clean up your edges under the counter with a foam brush. To get the Envirotex down the sink use the same method as with the backsplash. Let it all cure per the manufacturers label.
Also this would be a good time to mention that I made paper cones to fill the holes where the faucet and drain were to prevent any drippage.
By Sharee
Add your voice! Click below to answer. ThriftyFun is powered by your wisdom!
thanks for this info, I did mine and they came out beautifully
I have also redone my counters this way and they look great. It was very stressful but I love them.
My advise to anyone doing this is make sure you mix up enough enviro to do the countert. I did not and had to recoat because of dimples and divots.
I have noticed a couple of small scratches on the counter. I think if I wax them then the scratches would not show but what should I wax with? Also what do you use to clean the counters with?
Thanks!
Thank you SO much for the information! This is exactly what I was looking for to update our old 70's style master bath.

Wow, how does this method hold up?
Geez! Your'e my hero! The envirotex really saves time!
I used the instructions from www.thisfauxhouse.com. They are similar to these, but much more detailed, have picture progression and links and pictures of the materials. Plus the guy got back to me within 10 minutes on any questions I had. It was easy and mine turned out awesome. To each is own, but just thought I'd throw that out there.
Add your voice! Click below to answer. ThriftyFun is powered by your wisdom!