Diaper Cakes are all the rage as a baby shower gift. Here are instruction on how to make one for half the cost of buying one.
Approximate Time: 1 to 2 hours
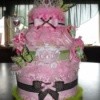
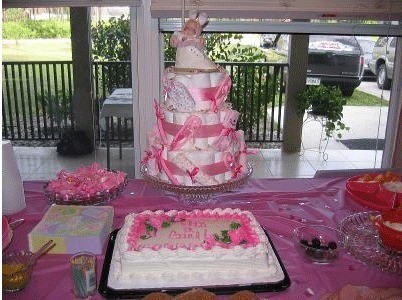
The number of diapers used for each tier will depend on a couple of things, like how big you want your first tier to be. I used a vintage cake stand so I made my first tier so it would fit on the cake stand and you could still see the paper doily underneath. I ended up using about 25 diapers for the first layer. The brand of diaper you use will also make a difference in the number of diapers needed because each brand of diaper has a different a thickness.
Step 1: Roll the diapers up starting at the waistband and secure with a small rubber band placed in the center of your roll. I started rolling at the waistband because this is usually where the manufacturer has added some cutesy design. I wanted my cake layers to be completely white without any color showing. You can incorporate the decoration into the cake design if you want but I found that most diaper companies use the color blue and we already knew that the baby was to be a girl. I wanted the cake to be entirely pink and white. Secure the rolled diaper with a small rubber band.
Step 2: Using your cake stand or cake disk as a guide, stand the diapers up on end on the cake stand until you form a rough circle that is about the correct size tier that will fit on your base. I used about 25 diapers for my first layer. Now using a large rubber band, secure all the diapers into a circle, being sure that your rubber band is in the center of your tier all the way around.
Step 3: Do the same for the next two tiers using the previous one as a guide. Each layer should be smaller then the first so when placed on top of each other, they look exactly like a three tiered cake. This is where using your cake stand or cake disk comes in handy in helping you to judge how your layers will look before you permanently attach them together. Before permanently attaching your layers with double sided tape stack them and make sure your happy with the way the cake layers sit on top of each other.
Step 4: Place your biggest paper doily on your cake stand or disk. Take the double sided tape and using about five or six pieces of tape make a starburst pattern in the center of the doily. Making sure the tape is just in the center of the doily. Set the first cake layer down in the center of the doily. Pushing firmly so the tape sticks to the doily and diapers. If you find that your layer is not centered simply remove the cake layer.
Step 5: Measure your 7/8 inch ribbon by winding it around each layer, adding an extra inch and cut three pieces, one for each layer. Attach the correct size ribbon to each layer using the double sided tape. Use about a 1 1/2 inch piece of tape attached to the back of the outer piece of ribbon overlapping the end of the ribbon. Press firmly so the double sided tape adheres to both pieces of ribbon. Make sure the ribbon hides the rubber band that is holding your layer of diapers together.
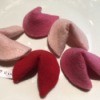
Attaching the gifts: For each item I attached to the cake, I tied a small ribbon bow on. It really worked well for the items made out of fabric like the washcloths and baby socks. The bows are a decorative element and added a pleasing look to the finished cake. This is purely my taste and if you don't like it, you can skip this step. Each gift item is attached with double sided tape. I tried using other adhesives but I wanted each gift to be usable and found the double sided tape worked perfectly. Glue did not work because it damaged the outside of the gift and the disposable diapers, making them unusable.
Step 6: Roll a piece of double sided tape on to itself and stick two or three pieces on the back side of each plastic diaper rattle, making sure none of the tape is visible, stick the gift item firmly on to the diapers in the area where you want it attached. Attach four of the plastic diaper pin rattles to the largest cake layer and two on each smaller layer. Try to get the diaper pins attached evenly around the circle of the cake layer. You can move them and reposition them if needed. Do the same for the rest of the gift items, making sure as you attach them they are arranged in a pleasing manner.
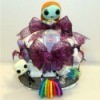
Ribbon Flower Buds: Using the low temp glue gun and glue sticks arrange the flower buds along the edges of the paper doilies.
Cake Topper: Using the double sided tape cover the bottom of your cake topper and firmly attach to the doily on the top tier.
Stand back and look at your work of art. It is beautiful isn't it? Your gift will be the talk of the baby shower.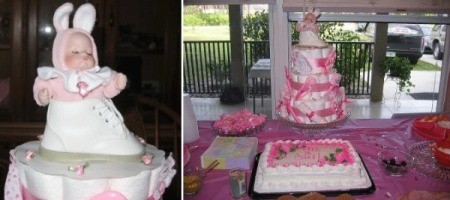
By Arlene M from S.W FL
Add your voice! Click below to comment. ThriftyFun is powered by your wisdom!
I have absolutely no need or interest in doing this cake, but I read your post anyway. Your directions are wonderful and very precise. I love that. So, I just wanted to tell you that and I love the fact that you can use all the items. Wish I had this info when I was younger!
I just think this is the greatest idea and gift I've ever seen. Thanks for giving directions. I will make one.
This is a grand idea. Thanks for giving us the directions. I have a baby shower this month to go to. Guess what they are getting??LOL!!LOL!!
Adorable! Here is one I made for my friend's baby shower. I had pacifiers made with the baby's name printed on them. She loved it!

Just another angle - the diapers had a printed design, so I wraped white onesies around to hide them. Other "ingredients" include washcloths, thermometer, socks, manicure kit, lotion, baby wash, mittens, teething ring, bottle and stuffed animal.

Add your voice! Click below to comment. ThriftyFun is powered by your wisdom!