You can build your frame any size you like but remember, you are going to have to weed some so you need to be able to reach across it. Mine was 2 feet by 6 feet. Please read through all the directions before you start. Remember you are simply building a rectangle shaped box.
Bed:
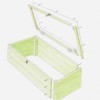
Lid:
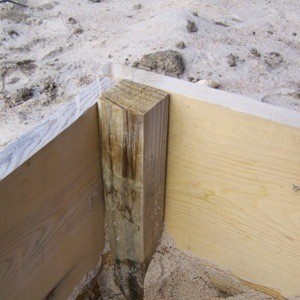
Lay out your frame by referring to the cold frame layout photo or pdf (below). Pre-drill the holes for your screws, two spaced evenly in the end of each long board. Notice two of the end pieces are 2 inches narrower on one end, that is to let water run off.

Decide on a spot for your cold frame that will get at least 8 hours of sun most days. Assemble your frame. Move your frame to the chosen spot and dig the dirt out inside 2 1/2 to 3 feet deep. Put in a foot of manure and water it good. Put in the rest and water well again. Make sure it is good and wet, otherwise it will pull all of the moisture from the soil you will now add, and starve your plants.
Add 6 inches of the soil you dug out of the hole and moisten. I mixed compost into my soil because we have a lot of clay in our soil. Your local Sale Barn will be glad to have you help them clean out their pens. Horse manure with the wood chips is great from stalled horses if you can get it.
Next pound the 2 x2's in the corners, center front and back, screw in from the outside to secure.
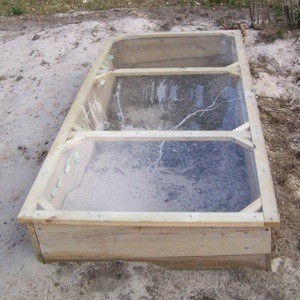
Now for the lid, Plexiglas is expensive so you may want to consider 2mm heavy clear plastic to go with. Wait until you get your lid built, and then measure to see what size you need. You will notice a question mark in the measurements of the short cross braces in the lid, which you may need to adjust for your frame. I chose to make mine hang over two inches on all four sides to assure unwanted water didn't get in. Also you may decide to go with plastic when you see the price of Plexiglas.
Assemble your lid and attach with the hinges on the back of the frame. You will want to attach 1/2 of the chain or rope from each end of the frame to the lid to keep the wind from blowing it off. I also put a hook and eye on mine because, here in Nebraska, we get a lot of strong wind.
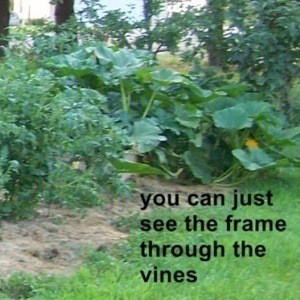
You are ready to plant. There is no need to start your seeds in the house and you can plant before the ground is warm because the manure will warm your soil and the lid will trap heat inside the frame. If you are concerned, you can put Styrofoam insulation around the inside of your frame.
Watch the temperature by your thermometer and prop the lid open for fresh air if it gets hot. Your plants need to get fresh air all they can, depending on your weather, open the box all you can to acclimate them. Keep the soil moist and transplant at the appropriate time for your area.
Source: Helping my parents garden as a child was a great experience.
Click here to download a PDF of the Coldframe Layout diagram.
By LATRTATR from LC, NE
Add your voice! Click below to comment. ThriftyFun is powered by your wisdom!
Instead of digging into the top soil, can you use the no-dig concept? (whereby one layers wet newspaper straight over the site where the frame is to be positioned thus smothering weeds and preventing the degradation of soil structure)
Add your voice! Click below to comment. ThriftyFun is powered by your wisdom!