With the help of simple, easily obtainable materials, and with a little ingenuity, a small, ordinary little box can be transformed into a quite presentable jewelry-box.
Here's how:
Approximate Time: Approximately 2 hours
Supplies:
- a small wooden box, easily obtainable from most craft shops.
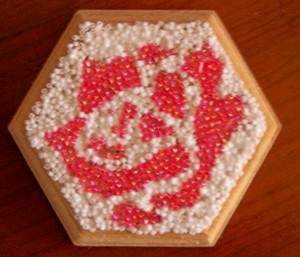
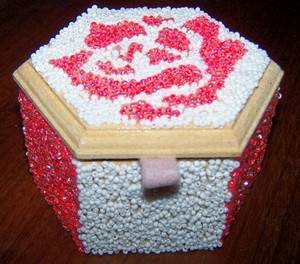
For this project, I used a box with a hexagonal shape, as this will lead to a more interesting result than just using a square box.
- a pre-cut stencil design
I chose a design of a rose, but any other design could be used.
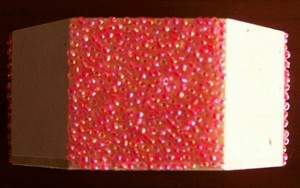
- seed beads in two colors
I used pink and white seed beads, as these fitted the design I chose.
- fine sanding paper
- a dry cloth, to dust the box
- a pencil, to draw the design on the lid of the box
- quick-drying glue
- quick-drying spray varnish
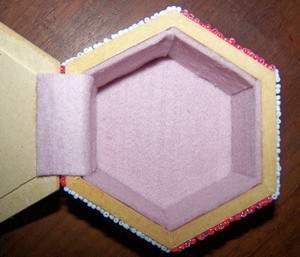
- felt in a matching color, to line the inside of the box
- a pair of scissors
Instructions:
- Sandpaper the whole box thoroughly. Dust well with a dry cloth before continuing with the next step.
- Transfer the design from the pre-cut stencil to the lid of the box.
- Use the pink seed beads and the glue to create an inlay. Remember not to use too much glue. A crochet needle may help to move the seed beads into their appropriate places.

- On the bottom part of the box, decorate 3 of the 6 sides with the pink seed beads. Remember not to decorate adjoining sides.
- Leave the lid and the bottom of the box to dry overnight.
- Cover the rest of the lid with white seed beads, carefully gluing the beads all around the inlay and making sure you do not knock off some of the pink beads.

- On the bottom part of the box, decorate the remaining 3 sides with the white seed beads. Remember to check that at the edges the beads fit in nicely.
- Again, leave to dry, preferably overnight.
- To protect the box from wear and tear, apply one coat of the quick-drying spray varnish.
- Again, leave to dry, preferably overnight.
- Cut pieces of felt to fit into the bottom of the box, as well as on 5 sides of the inside of the box. Then, glue them into place.
- For the sixth side, cut a slightly longer piece of felt, so that it can be folded to make a hinge.
- Make a small loop with the felt and glue this to the front side of the lid. This will serve as a handle to open the box.
By Benetta from Pretoria, Gauteng