 Tired of seeing the same old diaper theme baby shower cakes? I have been making them for a while now and have been wanting to get more creative with them. The perfect opportunity came when I found out I was going to be a grandma again :)
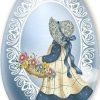
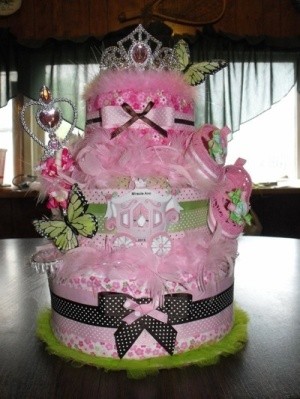
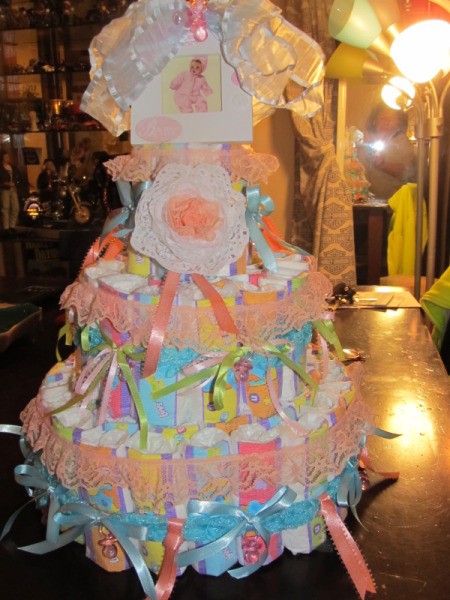
I decided I would try to make this cake really girly so I went with a princess theme. I made the standard diaper cake to begin with, then decorated it with 4 receiving blankets, a tiara, a princess wand with korker bows attached to it, a plastic silver bracelet, which I hot glued some teardrop pearls to, a pair of shoes with korker bows attached, the green "fluff" around the bottom is a tutu for the baby. I used lime green, pink, and brown ribbons (which look awesome together). The Cinderella carriage I printed out using my Hallmark program to personalize it with the baby's name and year of birth. I used a pink feather boa to top each layer and added 2 lime green butterflies. I am very pleased with the results and just wanted to share the idea.
By Tammy from Herrin, IL
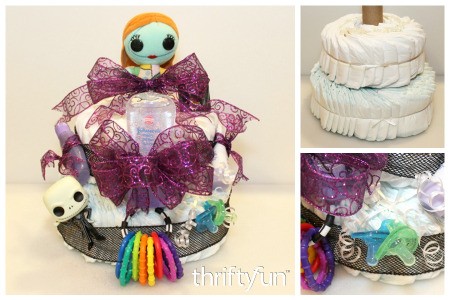
This is a page about making a Nightmare Before Christmas diaper cake. For a new mom-to-be, who is also a fan of the Tim Burton movie, a Nightmare Before Christmas themed diaper cake is an outstanding gift.
This page contains the following solutions.
Roll each diaper individually and secure with a rubber band. Most diapers have a pattern at the top of the diaper, if you don't want this to show, start rolling from the pattern end, finishing with the white on the outside.
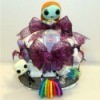
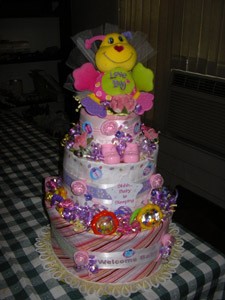
This is my 2nd diaper cake. A "Love Bug" cake. I made it for a friend at work. I used; 56 rolled up diapers, receiving blankets, baby rattles & such, washcloths, a love bug to top it off & lots of curling ribbon for color.
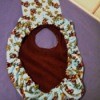
One of my best friends is expecting a little girl next month. We are throwing a surprise shower lunch for her at work and I thought that a "onesie cake" would be adorable for the table.
Diaper Cakes are all the rage as a baby shower gift. Here are instruction on how to make one for half the cost of buying one.
Try making a diaper cake for a baby shower. These darling diaper cakes make quite a beautiful site as a centerpiece for a baby shower. They are unique in that you can use almost every item bundled in this cake.
84 Blues Clues diapers were used for this cake, with small clear rubber bands and an empty paper towel tube filled with 3 diapers.
This is a photo of a Diaper Cake my niece recieved at her baby shower. It was made from pampers and stacked two layers high.
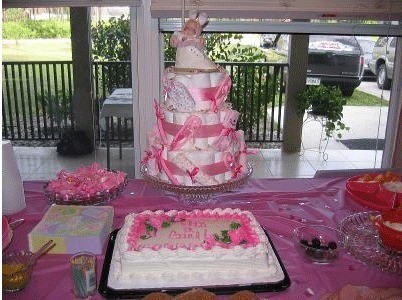
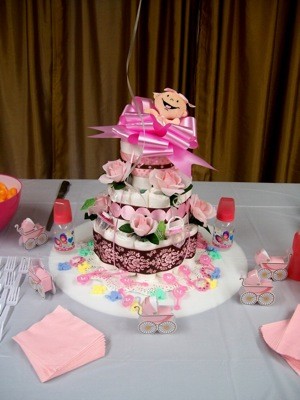
Baby showers, what fun. This is the diaper cake I made. Rosebuds and baby carriages was the theme. Silk rosebuds used on the diaper cake, decorated wire baby carriage, and wooden letters. Also silk roses placed around the punch bowl. It was a beautiful shower.
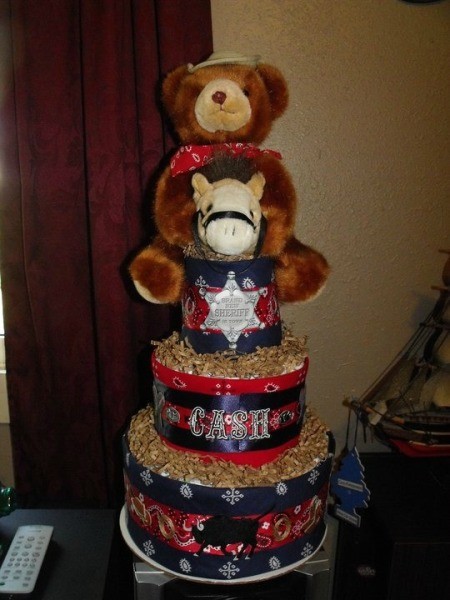
I made the basic diaper cake and decorated it with red and blue bandannas, bandanna ribbon, western/cowboy pictures for the scrapbook later, J&J baby products, and paper shred.
I wanted to share the diaper cake that I made for my sister's baby shower. It makes a great decoration as well as gift!

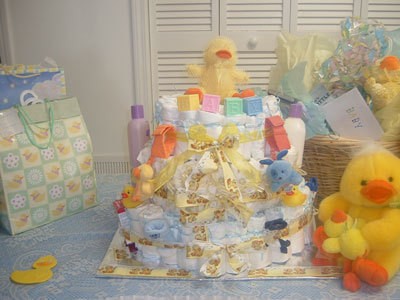
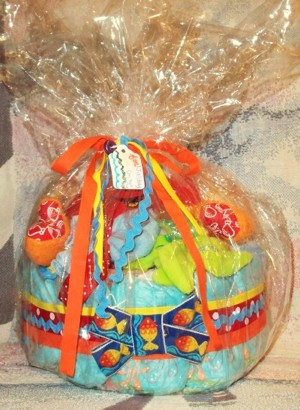
A unique and colorful spin on the popular baby shower gift, because babies just want to have fun in the water and sun!
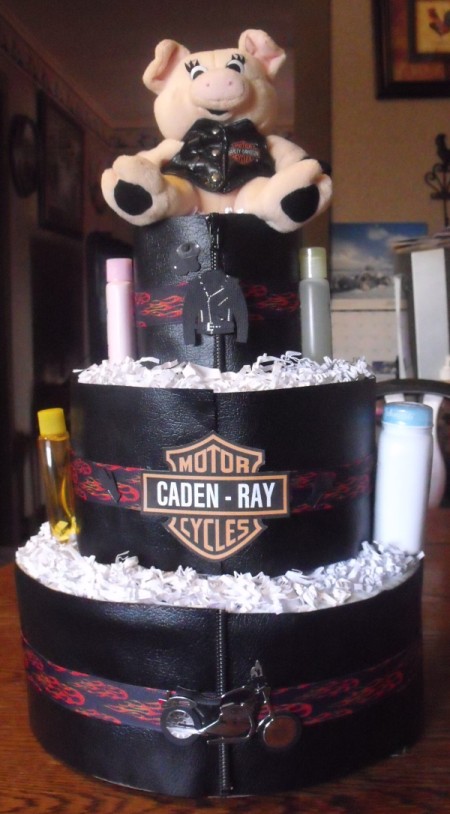
Make your basic diaper cake and decorate it using faux leather over the receiving blankets. I used black zippers to make it resemble a leather jacket.
Here are the questions asked by community members. Read on to see the answers provided by the ThriftyFun community.
How do you make a "diaper cake" out of disposable diapers? I am hosting a baby shower and would like to make one if it is not too complicated. Thanks in advance.
DIAPER CAKE : Open up a diaper and roll it from the design (front of the diaper) to the other end. Roll the diaper up real tight as it makes the cake look the best. Put a rubber band around the diaper in the middle. Repeat for the rest of the diapers, that you will be using for the diaper cake.
BOTTOM LAYER: Takes about 36 diapers. You will have 3 rings of diapers, if you want a "large" cake. Otherwise if you want a smaller cake, than do 2 rings. First ring will take about 6 diapers. Place diapers in a circle standing them on end around a 2 oz. sample size baby magic baby product or a 4 oz, baby bottle.
Put a large rubber band around this layer. Second ring will take about 12 diapers. Put the diapers around the first ring of diapers and place a large rubber band around this ring to hold diapers in place. Third ring will take about 18 diapers. Put diapers around the second ring of diapers and put a large rubber band around this ring also.
MIDDLE LAYER: Takes about 18 diapers. Repeat as above, except just make two rings of diapers. If you choose to do a 2 layer cake, put an 8 oz. bottle in the middle of the first ring. Otherwise if you do a 3 layer cake, then place a 2 oz. baby magic product or 4 oz. baby bottle in the middle.
TOP LAYER: Takes about 6 diapers for 1 ring. Place an 8 oz. bottle in the middle. Or forget the bottle in the middle and add an extra diaper and top off with a small stuffed animal or toy. Don't forget to put a large rubber band around each ring. Finish off with placing a half inch wide ribbon around each layer to hide the rubber bands on the outer rings of diapers. Place the smaller layers on top of the larger one.
You can tuck little baby things in between each diaper. Place the taller things (like bottle brushes, baby brushes, spoons) on the outer edge of the layer so that it does not interfere with placing the smaller layer on top. You can wrap a receiving blanket around the middle layer of diapers. Fold the blanket the same height as the diapers and fasten the ends together with diaper pins.
Have fun, be creative. Put in a clear plastic garbage bag. Attach a poem: "Here is a cake made with love, though I wouldn't call it yummy. For the ingredients that were used go on a baby's bottom, not in a tummy. Flour, sugar, milk, and eggs will make a cake so sweet, but diapers, blankets, and baby socks will make a handy treat."
Here are some other poems:
Here's a special gift I made just for you. I didn't have to sew or even use glue. It's filled with lots of things you see, but most of all with love from me!
Here's a cake for your special day,
Because the stork is on her way.
It's filled with lots of things for you,
On the outside, and inside, too.
Place them in your diaper bag,
So all the necessities you will have.
For the big day soon will come,
When you can show off your little one!
written by ~ Laura Kaye ~
Baby Cakes are so much fun,
they're sure to delight a new mom.
Filled with things from A to Z,
So many things a baby needs.
Diapers, toys, powders, and pins,
Wonderful times will soon begin!
written by ~ Laura Kaye ~
Here's a special gift I made just for you.
I didn't have to sew or even use glue,
It's filled with lots of things you see,
But most of all with love from me!
written by ~ Laura Kaye ~
6 Cloth Diapers, you can wash every day
6 More Diapers, you can throw away
Fold in 1 bib, in case baby should dribble
Add in 4 socks, to cover toes as they wiggle
Fold in 1 shirt (onsie), to keep in the heat
Bind with 4 pins, to keep the cake neat
written by ~ Tami Enos ~
Take 2 cloth diapers, you can wash every day
Add 6 disposable diapers, you can throw away
Fold in 2 blankets, to keep baby cozy
Add in 4 socks, to cover their toesies
Add in 1 shirt, to keep in the heat
Fold in 1 bib, to make cake complete
Then bind with 4 pins, to keep the cake neat
written by ~ Tami Enos ~
You will need:
14 - medium size diapers (depending on what size you want you may use more or less diapers)
1 - baby bottle
1 each - travel size lotion, powders, bath, shampoo, diaper rash
1 - small bib
1 - receiving blanket
1 - book
1 - brush and comb set
1 - set of baby fingernail clippers
1 - travel size Q-tips
1 - teether
1 - rattle
1 - cellophane bag (optional)
curly ribbon (optional)
rubber bands
lace and tape or ribbon
Take a diaper and open it and wrap it around the bottom of the baby bottle. Secure with rubber band. Take three more diapers and follow the same procedure. Pull the baby bottle up enough so there is room to place half of the bottle of powders inside, under the bottle. Lay aside.
Take another diaper and open it and wrap it around the bottom half of the bottle of baby powders. Secure with rubber band. Do the same with the remaining diapers. Now place the top of the bottle of powders inside the diapers with the baby bottle. Wrap a receiving blanket around the bottom and secure with rubber band. Place the brush and comb set behind the baby bottle, secure with rubber band. Place the book at the back on top of the bottom section and secure with rubber band. Tie the bib around the baby bottle so that it hangs in the front.
Place the rest of the items all around the cake to fill in the gaps. Place ribbon around the cake to hide rubber bands and tie or use lace and tape in the back. Print above poem and attach to cake. Place the cake inside a cellophane bag and tie with curly ribbon.
*You can use any items you would like.
*Add more or less.
*Use washcloths to make small ones called "cupcakes".
*Use disposable or cloth diapers.
*As you wrap the diapers around, hide small items inside the cake.
You can make it as simple or as fancy as you like. The one I made I decorated with flowers and butterflies, little baby girl shoes and candy flower lollypops. It was delightful and a HUGE hit at my daughter's baby shower. Good luck!
Search youtube for directions and use your own imagination. It will turn out great!
Do you know how to make the original 3 tier cake where you wrap Styrofoam with baby blankets and pin baby items onto each layer decorating the cake. Any help you can give me will be greatly appreciated.
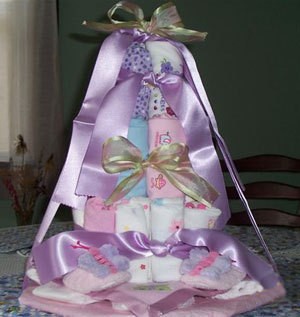
I used a cute baby bottle as the center. For bottom layer I rolled up receiving blankets around the bottle. The second layer was rolled up cloth diapers (or you could use disposable). I used straight pins in the center to secure both layers. On outside I used diaper pins. The top layer was baby wash clothes and socks. It was big. I recommend making and transporting layers separately, then put them together at the shower. Decorate the cake with small baby stuff, such as pacifiers, rattles, teething necklaces, etc.. Go crazy. It is so cute and fun. You can also use party decorations to match. Well good luck! Ohhhh, and tuck some chocolate inside for mommy!
Does anyone have a pattern for the baby shower diaper cake?
Sandy from Stewartstown, PA
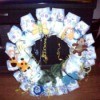
I don't have a suggestion for the diaper cake idea, but I do have a suggestion for a diaper wreath. My girlfriend gave me one when my last baby was born and I loved it so much I made one for my sister-in-law who is expecting her first little girl (after 4 boys) any day now.
You will need a wire wreath form. Open the diapers slightly and sandwich it around the wire wreath form. Use a tiny hair rubber band to scrunch the diaper up a little and help it stay on the wreath. Go all the way around the whole wreath. Then use curling ribbon to cover the rubber band and also add additional support to keep the diaper on the wreath. Then use some curling ribbon to attach "baby items" around the wreath. I used diaper rash ointment, pacifiers, a bottle, a bottle of baby oil and baby lotion, a brush/comb set, etc.
The fun part is to find diapers that might match the color scheme. For instance, I found that the Walmart brand White Cloud has purple diapers. These are what I used to make the wreath for my sister-in-law. But Pampers Swaddlers are yellow and Pampers Baby Dry are green, Huggies have blueish colored diapers. Anyways, you can use a different brand to make a more "girly" or "boyish" wreath or one that is more unisex.
How do you make a baby shower cake?
By Fredet Paulus from Port Huron, MI
Easy! Roll up individual diapers, rubber band around each one. Then stack them and decorate with ribbon or whatever you like.

ThriftyFun is one of the longest running frugal living communities on the Internet. These are archives of older discussions.
I made a very nice diaper cake for much less than the others I usually make. I bought the polka dot ribbon for $1 at the dollar tree.
This a picture of a diaper cake that I just made for a friend's baby shower. It was the first one that I made and found that it was very easy to do at half the cost of buying one.
I made this adorable diaper cake (my first one) for my first grand child's shower. I just finished it today. I was amazed at how easy it was to make.