I have found that people fall into three categories. Those who have money to hire people with the skills they don't have, the people who get hired to perform these skills, and mine - I am the "I don't get paid, but have to do it anyway" type. Since the skills I have learned have served me well, I would rather stay here anyway.
In the fall of 2000, I lived in Fairbanks, AK, in what I called a "QuanseSquareTrailer". It was a Quonset Hut, built over a square frame built over a 16 foot trailer. To stand on the outside, it was a hot mess. But then, most cheap living quarters in Alaska are. The rent was $500.00 per month and that included utilities. When you were living on Unemployment Income, it was doable and I didn't think I was going to be there for more than a few months. The plan was to stay the winter, wait for my mom to come up in the Spring so we could scatter my dad's ashes where he was the most happy, then come back to Oregon together.
Ah, the best laid plans...
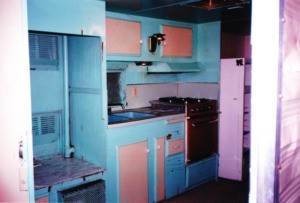
Once you are in AK and winter sets in, it's not easy to get out. Don't get me wrong, I love the state, even when it's too cold to open your front door. But, with no car or tools and not much money, you make do. I found this little "esthetically challenged" abode that was close to a bus stop, store, drive-in burger joint, and I grabbed it. Now, when you see the before photos, keep in mind that I saw a sows ear and made it into a silk purse. Well, at least it was 1000% better than it was before.
I suggested because of the length and detail and amount of photos this essay had, that I break it up over two essays, and the wise people at TF agreed. So, rather than break it up by time, I decided to do it by trailer vs. the box it was in. Now, whatever house you live in, I am pretty sure that you will appreciate it a great deal more once this journey of ours is over. So, if you are still interested in what was done, how it was done, and what it cost, sit back with a good cup of anything, and read on.
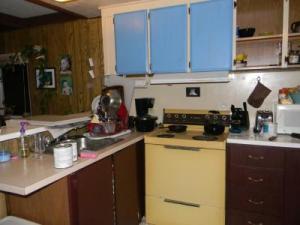
As you will see by the photos, the kitchen was the largest room in the original trailer. There was a bathroom you almost had to back into and out of, and an area in the back that was no doubt the bedroom/living room combo. I don't do gas, so the first thing I did was to cap that off, using the dinky little oven for pots and pans. I had a toaster oven big enough for anything that I cooked, a skillet and crock pot, and of course a microwave. I got all of those for free by the way, which I will go into later.
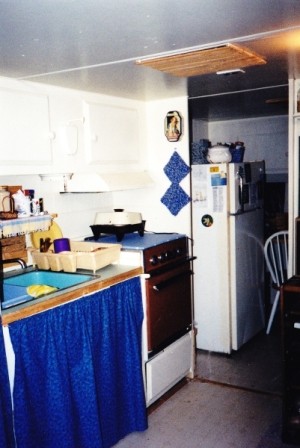
The fridge was in good shape, but it had to be left where it was. I thought of bringing it around to block off one entrance into the back room, leaving another entrance from the bedroom. I changed my mind when I realized there was a 5” gap between where the trailer floor and the main floor met. Filling that gap was easy, but not tripping over it was not.
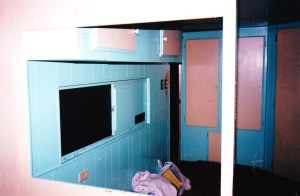
Most of the windows were the standard crank type that older trailers had. I love a cool breeze when I do dishes, but not in October. There were some carpet padding scraps in the bedroom when I got there, so I cut a piece the size of the window, sealed it with duct tape, and covered it with lathe strips. The dark had already settled in for the year, and there was nothing to see but someone else's bathroom, so I didn't lose much.
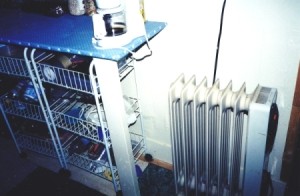
I stored the gas burners and covered the top of the range with a scrap piece of plywood, sealed it, and used it for counter space. The trailer was over 40 years old, but everything still worked. Some of the exterior walls had to be shored up to keep out the cold, but with some good caulking and foam sealer, it wasn't much work or money. Once it was more airtight, a little radiator heater that circulated oil kept me warm even in the toughest of winter weather. I also had a small crock pot going all the time, as the weather is so dry and you feel that inside your home, too. Keeping the air moist allows you to breath easier and not get chapped skin.
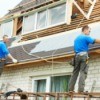
One of the tricks to Alaskan housing is that most, if not all, have what is called a "lean to" or porch that keeps out some of the cold. Also, the doors are not facing the same direction, which keeps drafts from coming in the same direction. You can keep things "temperate" with a 150w bulb on the porch at all times, which keeps a surprising amount of heat where you need it. I actually used a heat lamp to keep my pup warm when she came in from outside. When I finish the essay in part two, I will go through making a "poor style puppy door".
Sealing the drafts and getting the kitchen "useable" took about 3 days. Because it wasn't my first winter, I knew ahead of time the little tricks you use to keep things running. During the night, you throw a quart of warm or hot water down the toilet when you flush. You keep valuables like nice photos of family off the walls so they don't draw moisture. Throw rugs are your best friends. And as before, any window that is not going to give you light or a view can be weatherproofed and covered. For some, that is like living in a cave, and they can't handle it. I guess I was born for it, because it made me feel private and secure.
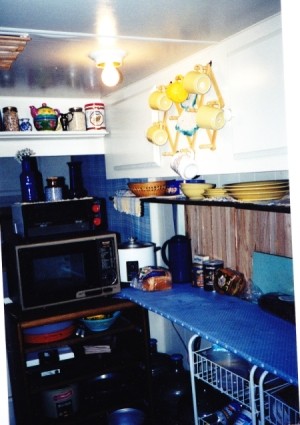
The next thing I did was paint. It was white for the entire project as that does give you an open feeling, and that took about a day. I didn't bother with the insides of any cabinets or closets, but did include the ceilings. Since the vent from the trailer just led to the inside of the house, I covered that up with lathe strips, too. The floor was ugly but in good shape so I left it alone.
You are going to see me talk some about lathe strips. For a cheap and rustic/country look, you can't beat them. Plus, they were only $.19 for a 4 foot length, and did so many things for so little money. In the next essay you will see why I bought them in bundles of 60. I used them in every room of the house, with either glue or small tack nails. On the other side of the kitchen, there was a large window that had glass in it from the original trailer, and the lathe strips from the other side showed through. With an old closet louver door and some gray "L" brackets, I had counter space for appliances and such. I made a couple of shelves above for dishes, pretties, and kitchen things. The landlord gave me a microwave cart that held all the rest of the kitchen things we need like crock pot, coffee maker, etc. I got a couple of the roll around carts underneath. One was for foods like pastas, spuds, onions, and one for my plastics. Most of the cabinet doors and the drawers were trashed, so I just took them off, which helps keep pipes from freezing. With some fabric to cover them, the kitchen was pretty much done.
As I said before, the bathroom was very small, just 4x4 feet. The sink was so small I could cover it with a dinner plate. But again, everything worked, so I didn't mind.
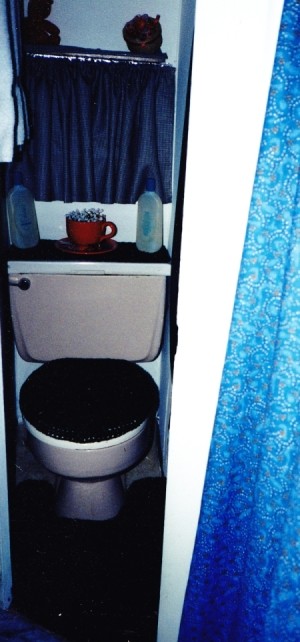
Once it was painted, I found a black shower curtain, crocheted some seat and tank covers, and found a rug that just fit around the toilet. There was another window, but it had already been covered by the living room wall, so I just had to make some curtains. A little shelf here and there, and my red accents, and it was livable. I am not sure why someone would make a peach colored sink and toilet, but when you look at the colors in the kitchen before I guess it made sense. It took three coats to cover the kitchen aqua, so I was happy the bathroom didn't have any. The bathroom renovations took about 2 days.
The back room would be where I did my crafts, so it didn't have to be pretty, just functional. Again, I had to put some padding in the windows and seal them. For covering, I simply taped up some flattened cardboard boxes. I was lucky that there were cupboards above the sleeping area for clothes, that went for supplies. The table was a hollow core door with "L" brackets in the back and 2x4 supports in the front. I did the same thing for a desk that I will show you later. The chair was a toss away from down the street in perfect condition.

I did have to buy some tools, but three thrift shops were within 8 blocks of me. I got some hand tools of course, a drill and jigsaw. The rest of the supplies I got at the local Fred Meyer, which took two buses to get to. Then, when I was done shopping, my friend who worked there would drop me off on her way home. Fairbanks is a fairly big city but they have an amazing bus system. Each "line" had a color, and the schedules and passes were printed on that colored paper, so you couldn't get lost. I would walk 2 blocks, cross the street and catch one going down town which was about 1/2 of a mile. A nice walk in the summer, but not when it's -5.

I promised I would talk about the free stuff so here it is. Alaska has a really good attitude about being thrifty and knowing that people have needs they can't always meet. Their Recycling Centers are arranged with big bins about 3 times the size of ours, marked "glass", "boxes", "carpeting", "newspaper", and the like. But, they also have an area where there is a floor and a metal roof with bins that you can leave good things for people to come and get. I got things like flannel sheets, couch pillows, the couch itself, all the appliances I owned, clothes, shoes, coats, furniture and even once, a big bag of yarn. In the middle of or even the start of winter, no one can have a yard sale. So, they take the things they don't want or the thrift shops can't take, and give them for those who need them. My friend and I would go out there on a Friday afternoon and take what we didn't need and take back what I did. She had a nice job and house and never took anything, and I took only what I needed. Craigslist wasn't around then, or if it was, I didn't have a computer. There is a really good "help thy neighbor" attitude up there that is unmatched down here.
So at this point, my little hovel is livable in the trailer section, and this essay is done. I hope you enjoyed it and look forward to the"rest of the house" next time.
PBP
By Sandi/Poor But Proud from Salem, OR
This page contains the following solutions.
I renovated this little Quonset Hut over a Square over a Trailer in the Fall and Winter of 2000 in Fairbanks, AK. The first part of the work was to get the kitchen, bathroom and work space done. Now I will fill you in on the rest of the house.

Here are the questions asked by community members. Read on to see the answers provided by the ThriftyFun community.
My husband and I recently bought a 1994 mobile home that is very good shape, but needs updating. I have vinyl wall paper on the walls and need to know what the best way is to remove it. Also is it a good idea to lay laminate flooring in a mobile home? I am completely remodeling this place any advice is appreciated.
By Franki from Hornbeck, LA
I ran into the same problem. No need to remove it. Just paint over it. It will be alot faster and cheaper.
You can remodel a mobile home the same way you would remodel a stick-built house, including using laminate flooring. Just follow the manufacturers instructions. The vinyl on your walls might not be wallpaper, though, it might be part of the wall panels that were installed at the factory. I agree with barrsbits, just paint over it. Trying to remove it might cause permanent damage to your walls.
I used to work for an energy assistance program. Before you worry about aesthetics, check the belly board under the flooring. It's a band of supports for the insulation and it and the skirting is very important in keeping your home warm this winter. Yes, painting, esp' with a textured effect, would be much easier. You can get better door for a little more sound proofing, and if not, you can get kick plates that can be installed lower to cover that silly 1" gap under the door!
You can provide almost as much warmth with throw rugs as you can carpeting, for so much less money and no fumes from carpets and glues. You don't often find good wooden supports along the molding where the wall and floor meet, so keep this idea in mind.
If you want to replace your cove molding or mop boards as it is sometimes called, either paint the existing with Rustoleum or take off the old, and glue the new on between where you can tack it on with smaller nails.
Good luck with everything, and when it's all done, show it off to us!
My husband remodeled our kitchen and one thing to remember is there is always movement in a mobile home. Unfortunately we chose laminated tiles for our kitchen and soon afterwards they started showing gaps in between the tiles.
Laminate flooring is not good for mobile homes, due to the stability issue. And yes, paint over the paper, or cover it with a diff paper that you like. Mobile homes are very inexpensive to redo inside, and can be done often.
I'm in the middle of remodling my double wide mobile home. I removed the slats that cover the vinyl covered walls, and spackled the cracks. Use mesh tape to help, if you don't know how to spackle well. Use a wet sponge to help get rid of excess spackling, to save time sanding. Before you paint, you must prime first. My dining room had paneling, and after priming, I used Paper Illusion, bought at Lowe's. Beautiful effect, and quite easy to do.
I'm living in my third "mobile" home now. Before we lived in a single wide, that we remodeled the kitchen. Put in new cabinets, new vinyl on floor,new sink,etc. What we've learned on all remodeling is: Always expect the unexpected, and always plan for it to cost more than originally planned. (Like we didn't realize our window air conditioner was leaking down our wall and rotted the floor and sheetrock.) Some mobile homes are made very well, and it's much like a house what you have to work with, and then there are some...well, let's just say that sometimes you have to adjust things a bit.
Back in Feb I did a lot of remodeling in my mobile home. It took my husband I a month to do but it looks great! We removed the chair rail in the living room and by doing so we had to replace the battens that were covering the seams which we did with lattice pieces. We also put cap pieces on any outside corners, cove pieces for the inner corners. We ripped up the carpet in 3 areas, then had to remove the staples and nails in the sub floor then sanded the exposed sub floor. We laid grout-able vinyl tile diagonally in the kitchen, living room, hall way and guest bathroom.
Is this the first time you have lived in a mobile home? If you have any questions, please don't hesitate to ask.
I need to say a couple of things. My late husband had MS and the shag carpet that came in our manufactured home in the 1980's no longer worked. Home depot installed commercial carpeting! It was wonderful! So easy to take care of and we put it in four rooms. No problems.
The other thing is when we rented it out for a couple of years due to my job moving the daughter of the renters put two or three fist size holes in the bedroom wall. I was really upset. But a carpenter came, secured mesh in the wall with putty and then did spackle and I painted over it. Could not tell anything was wrong!
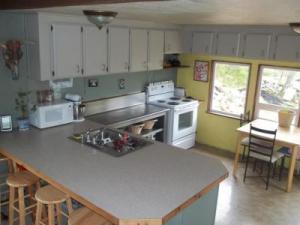
This is after (before pic below) we spent under 1000 and the reason the price was as high as it was is because we bought a new stove for 400.00 We did peel and stick tiles which have still been great (remodel a little over a year ago) and used things we already had. My husband and I did all the work ourselves and we think it turned out pretty good. Since this picture we have done a little more work, such as putting the microwave above the stove and adding knive bar, etc.
Vinegar water spray on it will yTake that off the walls
The "wallpaper" on mobile homes of that era are made of a compressed gypsum material that has a weird texture and an unfortunate floral pattern "baked" into it you can recover it with another wallpaper or paint, but unless you're really ambitious and physically ready for it, you'll likely have to deal with the 4' strapping things that cover up the seams. You can do this by using a sharp putty knife to remove the seam cover, then you'll take some drywall putty or spackle and even out the gap. Sand lightly and paint over. This is too daunting of a task for me as we've got 11' ceilings, so I simply painted them over and do my best to ignore them.
What I've done in my kitchen is paint over the heinous fake dark dismal wood cabinets with the brightest white they had. Warning! You likely have MDF cabinets and you won't like it, but you have to seal them with an oil-based primer before you paint them in your final color. Oil-based paint just plain reeks and I nearly gagged, but I got on with it as fast as I could. The only thing that I wish I had done was mark each door and hinge area right after I'd taken them off because I definitely mixed them up and a few of them don't hang right. You don't need to go wild, just a firm pencil mark 1-1, 1-2, 1-3, et cetera.
Then I got an amazing deal on some peel-and-stick/contact paper online at Temu for just $15 A roll! I only needed one roll, at 119", and the pattern had a very easy match up with the next piece. Again, the only thing that I wish I had done was to have my husband help me cope with putting it up evenly so that we got a 100% match, but it's only a few areas where I didn't get it exactly perfect, so I can live with it.
I was on a "roll" with the contact paper so I went for it and ordered a Carrara "marble" contact paper. I had an island to cover as well as the small countertop, so I bought two rolls at $9 each. This pattern was pretty, but very hard for me to match up well. I did my best, but it's definitely an amateur job. My husband hates it, but I told him that he could live with it or pony up and put in a new counter top. We'll be living with it until we've gotten up the courage to get one of the epoxy paint sets, which is what I wanted in the first place.
So go for it! Look around online for something that they have enough of in stock, make certain that your measurements are 100% correct, then go for it! Sure, it's a lot of work and you're guaranteed to break a sweat, but each one of us feathers our nest in the way that is best for us!
I want to convert a small bedroom to a bathroom in my mobile home. Any help would be appreciated, thoughts, questions, or suggestions.
Thanks!
Plumbing is simpler in mobile homes. Tbe water shutoff valve is under the edge of the home. You have to be careful to use attach all fixtures to the studs, since the walls are thinner and cant support the weight. Here is a good article to read. homeguides.sfgate.com/
I have so much to do to my mobile I don't know where to start. The walls need repair and the roof leaks even though I had it sealed. I am a single parent and I don't know where to start or how to do much of the repair. I can't afford to pay someone else to do it. Any suggestions?
By K from Wilmington, OH
Unless you really know what you are doing, you might be better off hiring somebody to do it. Otherwise you are wasting your time and money. Do you know anybody that would know what they were doing, that you could do some bartering with for repairs? If you had the roof sealed recently, and it still leaks there is a possibility that some areas weren't completely sealed. As far as what to do with the walls, it would depend on the type of damage and if it is on the inside or outside walls.
The first thing to do is get that roof sorted. Then you can move on to repairing the walls, which are probably in pretty bad shape from the roof leaking-how long was the roof leaking, was it months, or years?
You write that you just had the roof sealed, which says to me you had someone do it for you-was it a contractor? If yes, you can probably get him/her back to do the job right and get that roof completely sealed. If it was a friend or relative, see if you can get them to help you put on another more complete coat of sealant (Kool Seal is a great product but must be applied properly).
I've done three renos on single-wide trailers, it's fun after you know more about what you are doing. As a nice bonus, there are some really good reno sites that can help you with advice. The following link is one that helped me learn a lot about repairing and renovating trailers and mobile homes:
Good luck, I hope your project turns out well.
My girlfriend has a trailer, and it had to be regularly caulked, like a tin can! She did it herself, so it can be done diy. I saw that spray caulk on TV where they use a screen door for the bottom of a boat & thought that that would be great for mobile home users, easy to apply - but a bit pricey. All the seams should be sealed. And seal around gutters What's wrong with the walls?
Hi k. Been there done that. It is doable as a woman too. I did it. The first thing is correct the roof problem. It is a black tar comes in gal cans and 5 gal. I buckets start with the gal. Can ..It is cheap and can be applied even in the rain. Unless you have big holes in your roof it is fairly simple. Apply a coat of wet or dry tar. Make sure not roofing tar...Wet or dry which means you can apply it in the water. I applied it in a hurricane my kid would tell me when the water stopped and i would go to the next one. Usually older trailers leak at the seams whether you can see it or not. If it is rusty use a rust preventive like ospho, or a like product it sprays on and by the next day will turn grey then apply the wet or dry over it. This is a good start.
Find a mobile home place or someone who actually works on mobile homes is a must and talk to them and if you can do the work yourself. Then do so as I did but if not check out his work by looking at some of it. It is crucial that he know how to work on a mobile home or he won't do it correctly. If the windows leak to fix properly you would have to take out the whole window and replace the caulking behind the frame (a house trailer moves and caulk of any kind won't do it) but the wet or dry doesn't harden completely and will make it water tight and it does now come in a caulking gun. Wet or dry and is a black tar it is also the same thing as you used on roof.
Space and time doesn't allow me to tell you all you truly need to know but if you do try to do some or all of this email me and I will try to make it easier. I fixed house trailers for 8 years after i fixed mine. Not as hard as men made it out to be and I just went one thing at a time. Talked to people and picked their brain and raised my 2 children in that home too. It is worth a shot but most repair people only rip you off. Check with your local defac office and see what government programs they have in your county to help you. You pay nothing just remember the wet or dry and if they don't use it it won't stop the water. I did my camper in the rain in Minnesota in l988. Hope this helps some and a whole lot of prayer.
My husband and I just bought an older mobile home and now we're in the process of completely remodeling it. We need ideas. Maybe someone has done the same and has before and after pictures, and websites, or anything you have would be greatly appreciated. Thanks.
By jnjohnson225 from Somewhere, LA
Just Google "remodeling a mobile home" and you will find lots of links to ideas.
My husband and I have enclosed his 20-year-old doublewide with vinyl siding, converted the carport to a garage, laid hardwood floors, completely replaced the kitchen and bathroom cabinets, laid tile floor in laundry room and painted two rooms. The front porch has a new ceramic tile floor and set of concrete steps; a deck with ceramic tile floor, roof and frame for screening has been added to the back of the house. With my son-in-law's help the fence across the back of the property has been replaced. We are currently working to complete painting the living room.
Many of the materials and supplies came from Habitat Restore or craigslist. yourtube.com and doityourself.com are both good resources for how to make modifications.
Some people say never to paint interior walls of a mobile home since the crevice between pieces of drywall is covered by a strip. Just carefully remove the strips and paint them. After the walls have been painted reattach the strips. It helps to number each strip so you know where it goes.
We live in a 1969 mobile home and just painted all our dark paneling with a light coffee, with crown molding. It looks great. We are getting carpet and now want to put baseboards in. We have thin rounded corners that will leave the baseboards sticking out.
Do you have any suggestions so we don't have to replace all these corner moldings? Thank you for your feedback.
Just stop the molding when you get to the trim.
Pre build new corners and glue & nail new corners in place. Your base board will look so much better meeting up at new corner. Note...use construction adhesive or proper fast curing glue along with the least length of finish nails! Make it look the best by doing it right!