A few years ago I was looking for a way to help supplement my son's savings to pay for his 8th grade trip from San Diego to Washington , D.C. I am very fond of watching the HGTV network and finding ways to recycle everyday items into something new and useful. As luck would have it, I noticed my neighbor regularly discarding wooden wine crates in the alley.
On one of my evening walks with my dogs, I dragged one of the crates home, and the rest is history. I have probably made hundreds of these by now, and have actually done pretty well selling them at local craft fairs. It took a few trials and errors, but I am quite satisfied with the finished product I have come up with.
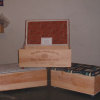
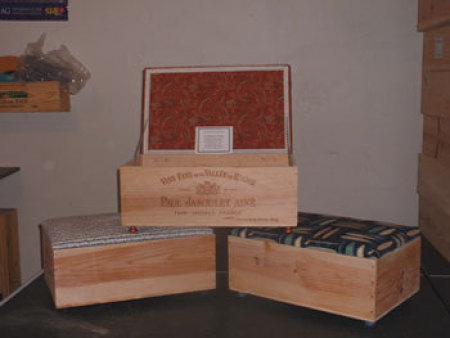
First I take the crate and sand it smooth, removing all staples or stickers that may be on it. Next I measure the top, and cut a piece of 5/8 inch thick plywood or wafer-board (also scavenged from the alley,) to fit neatly on top. I drill holes on the bottom at each corner and attach wooden knobs, usually scavenged from old discarded dressers etc. which act as feet on the bottom of the footstool.
After sanding the ply-wood top, I measure a piece of fabric to line both sides with, one piece about 1 1/2 inches larger on all sides, than the actual lid. Initially I used remnants from sewing projects, but it only requires 1/2 yard of fabric, so I can afford to go a little wild when fabric goes on sale. I cover one side with spray adhesive, and carefully cover it with the smaller piece of fabric.
After the glue has dried, I place the lid on top of the box (padded side up,) and attach 1 1/2 inch hinges to the back edge about 2 inches from each end. When it's finished, it makes a great storage footstool or bench, strong enough to sit on. They make great gifts, and are a wonderful conversation piece to give as a gift to a wine collector, perhaps including a nice bottle of wine.
My son uses his to store all of his video game junk. I put casters instead of wooden feet on the bottom, so he can just roll up to the TV, sit on it while he plays, then put everything back inside, and roll it back into the corner.
You can make them to match any decor. They make especially wonderful baby gifts, which match the nursery, and can be filled with a matching quilt, or any other baby gifts you can think of. As the child grows, they make a great toy box! I think they would make a great addition to any college dorm room. When any gift giving occasion comes around, I just go down to my work room, and pick one that suites the recipient. Making these little storage footstools, has become my own personal therapy.
By Donna Napolitan from San Diego
Add your voice! Click below to comment. ThriftyFun is powered by your wisdom!
I really love your idea, practical, and they are so pretty.!! I can see why you get such enjoyment from creating them. I like the plan of the wheels on them , being able to move it around, is so much easier when using it as a storage piece.
They look very nice! You don't say how you price them.?

WOW very nice. Thank you for the great photo and the details. I might try one for me.
This really is a great idea and I can say from my
own experience with doing the same thing that it's
easy and well woth the time to do.
I made a Barbie doll trunk with a box the same size
Your chests are beautiful and so well done. Thank you for sharing them with us.
All the Best,
Julia in Orlando, FL
Very unique idea. I have to say that you have a real knack for making those. They look great, and the craftsmanship is excellent! Thank you for sharing.
Patrick
Add your voice! Click below to comment. ThriftyFun is powered by your wisdom!